
Integration Guide
Objective
Developer can use multipass to develop service that allow shopper to login to SHOPLINE store with 3rd party account credential
- Give merchant the ability to have SL and 3rd party account linked
- Enabling auto logging in to SL store from 3rd party applications (i.e. mobile apps)
Intro on Multipass for merchant & app
Currently, there are two type of Multipass which are designed for Merchant and Vendor (App developers).
No matter using merchant side or app side flow, it involves below key steps.
Developerget themultipass secretvia EC admin / APIs- Generate
log in tokenwithmultipass secretandcustomer infowith pre-defined format - When
end usertry to logged in,Appsent multipass token in SL storefront - SHOPLINE system validate if the
log in tokensent is valid. If yes, customer log in seamlessly into EC store
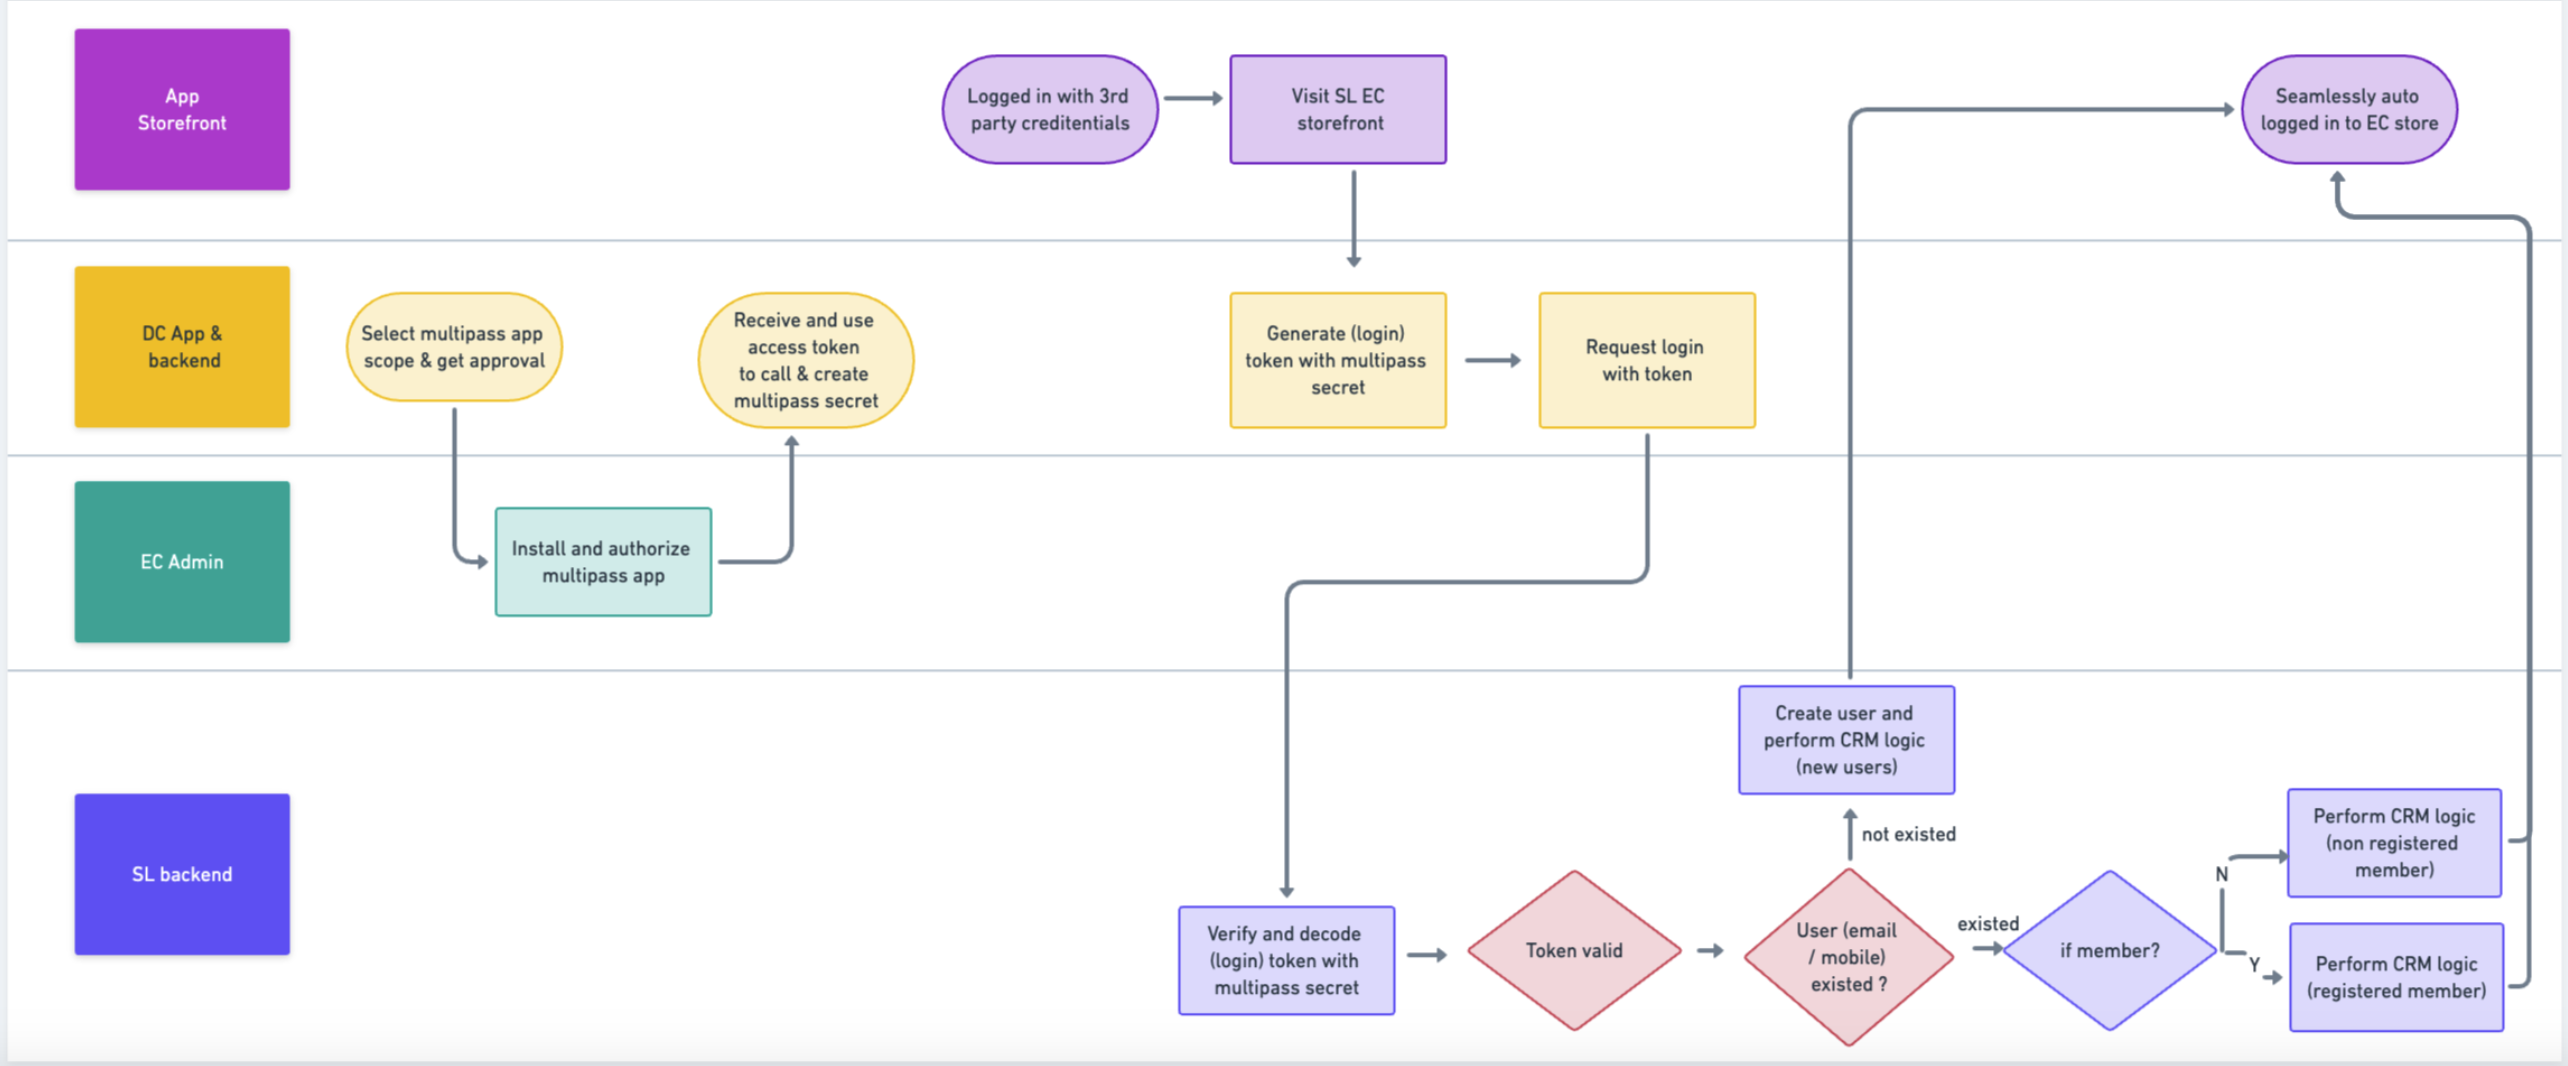
App flow used for illustration
Multipass for merchant
For merchant that have internal developer, they can subscribe the "Multipass App" (Ref.) and then retrieve App secret in EC admin.
Enable Multipass Login in the Customers Settings Page
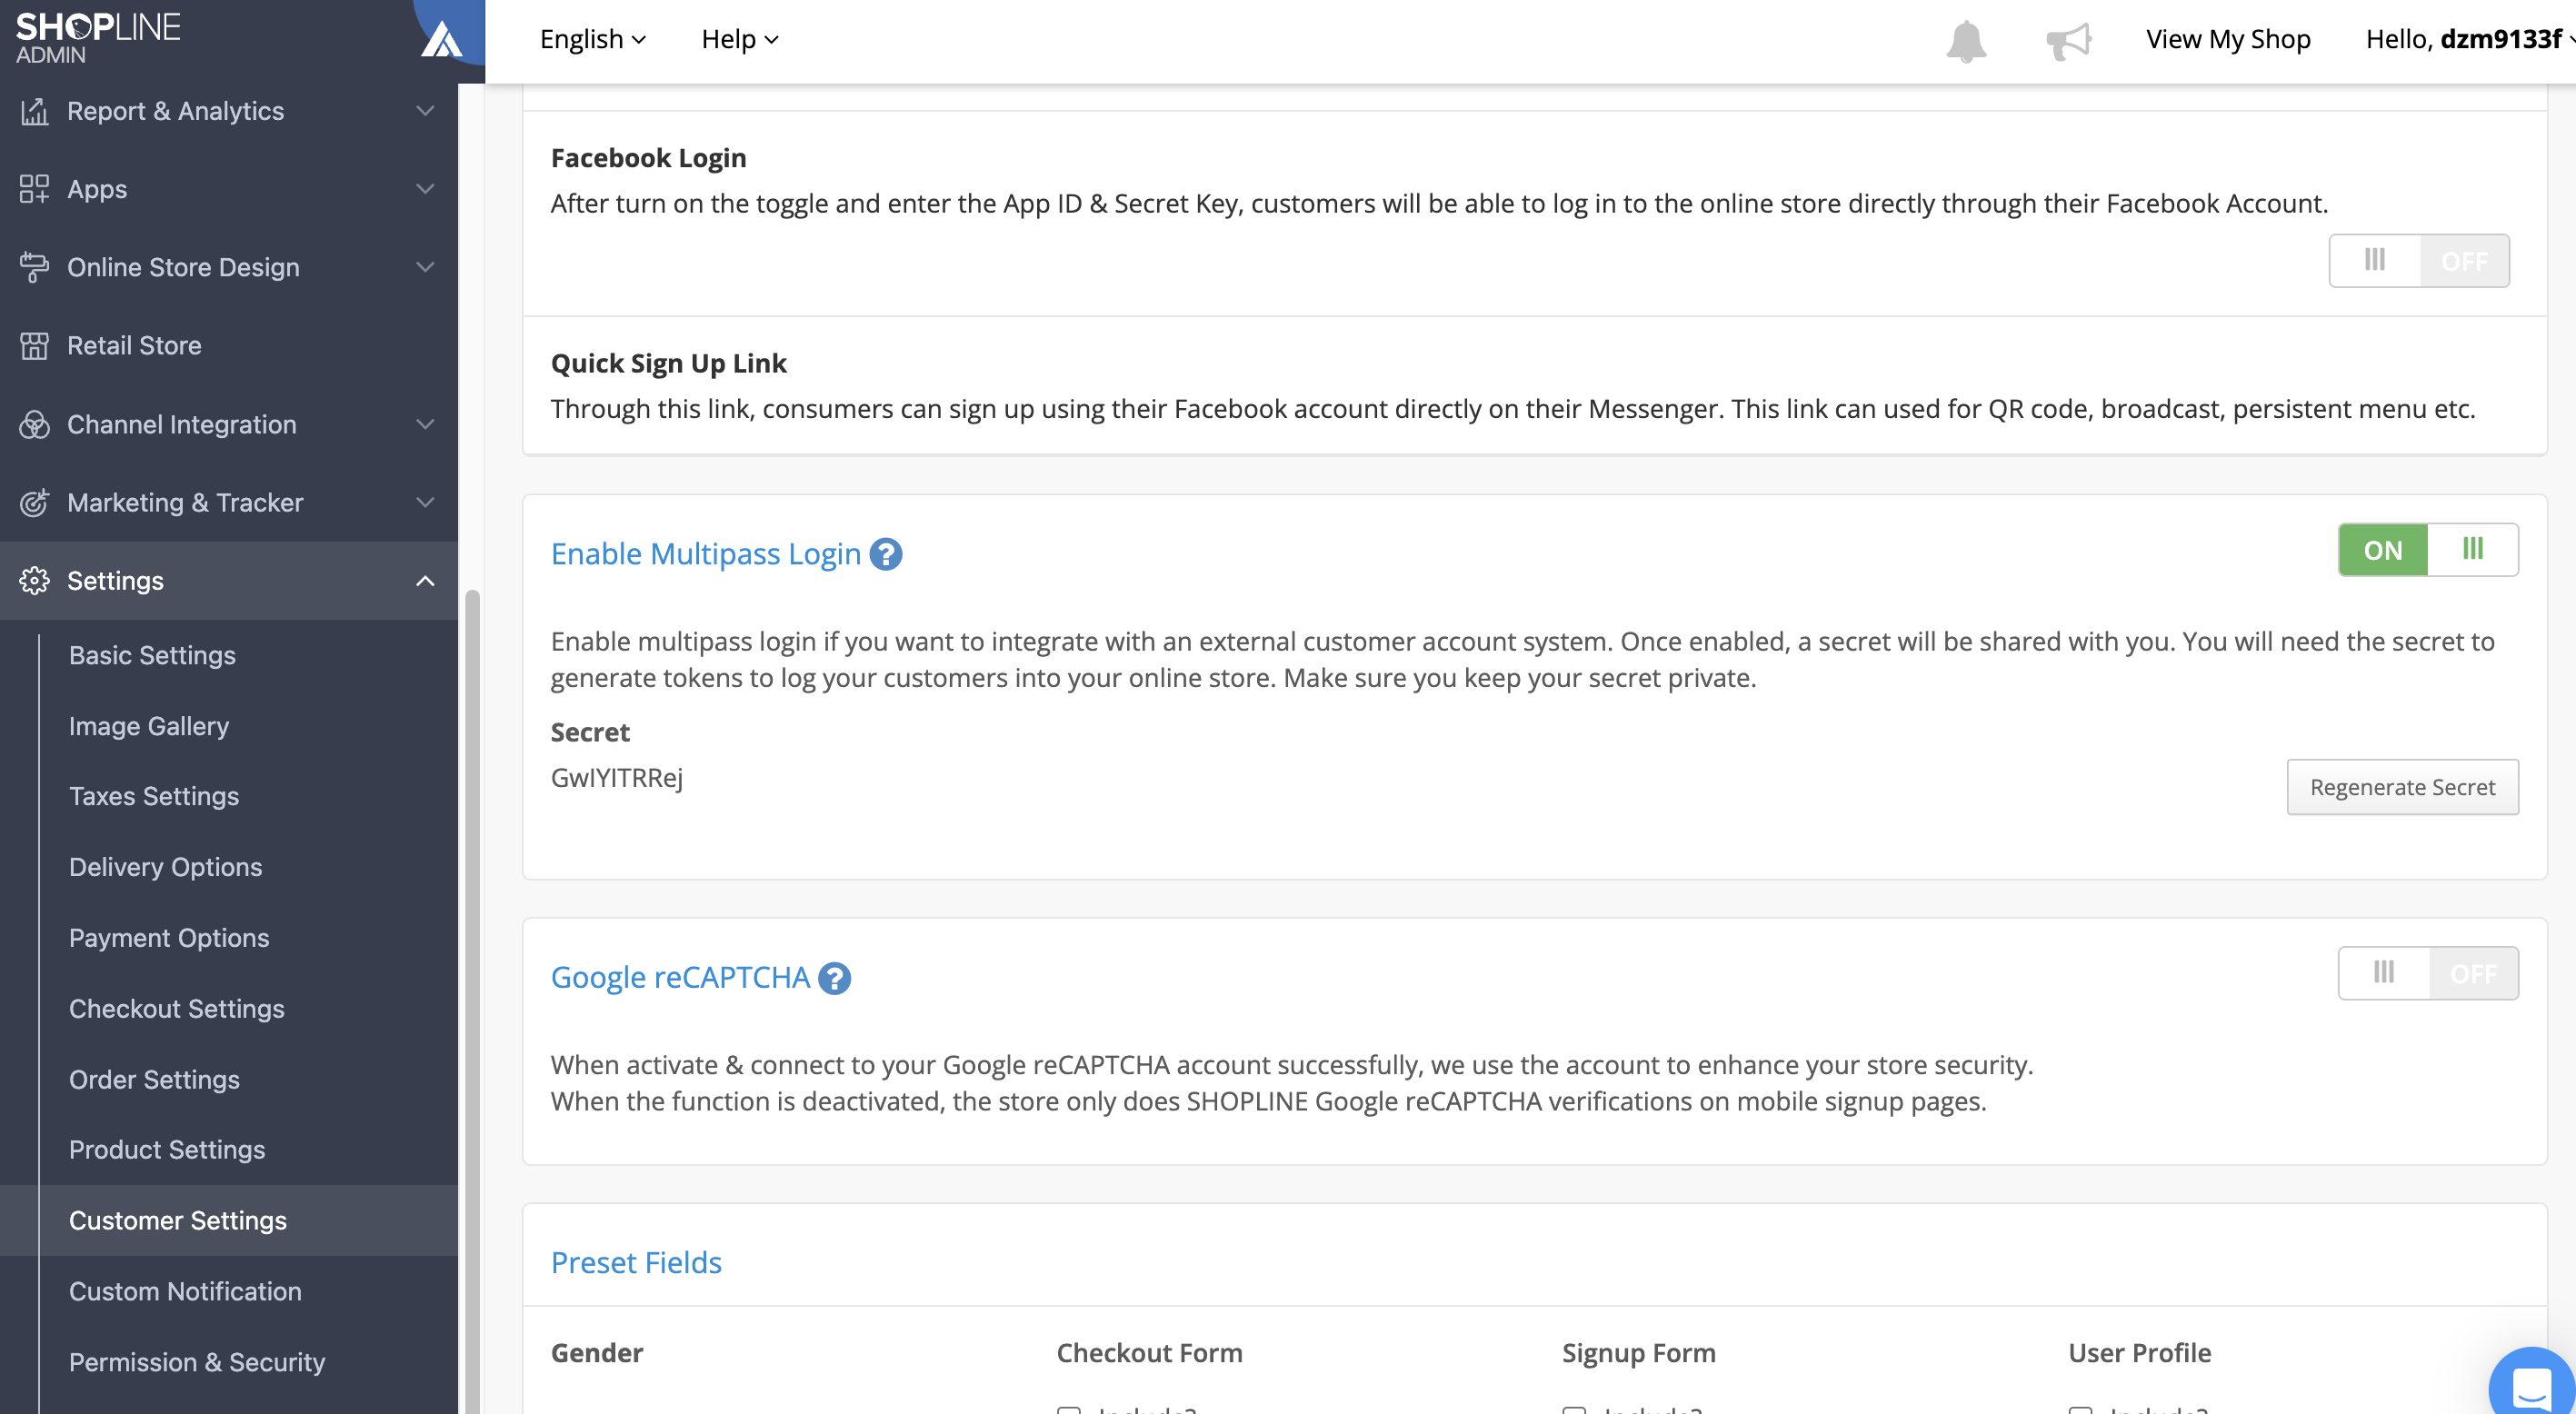
Retrieve the secret
Click on Generate Secret to get the secret
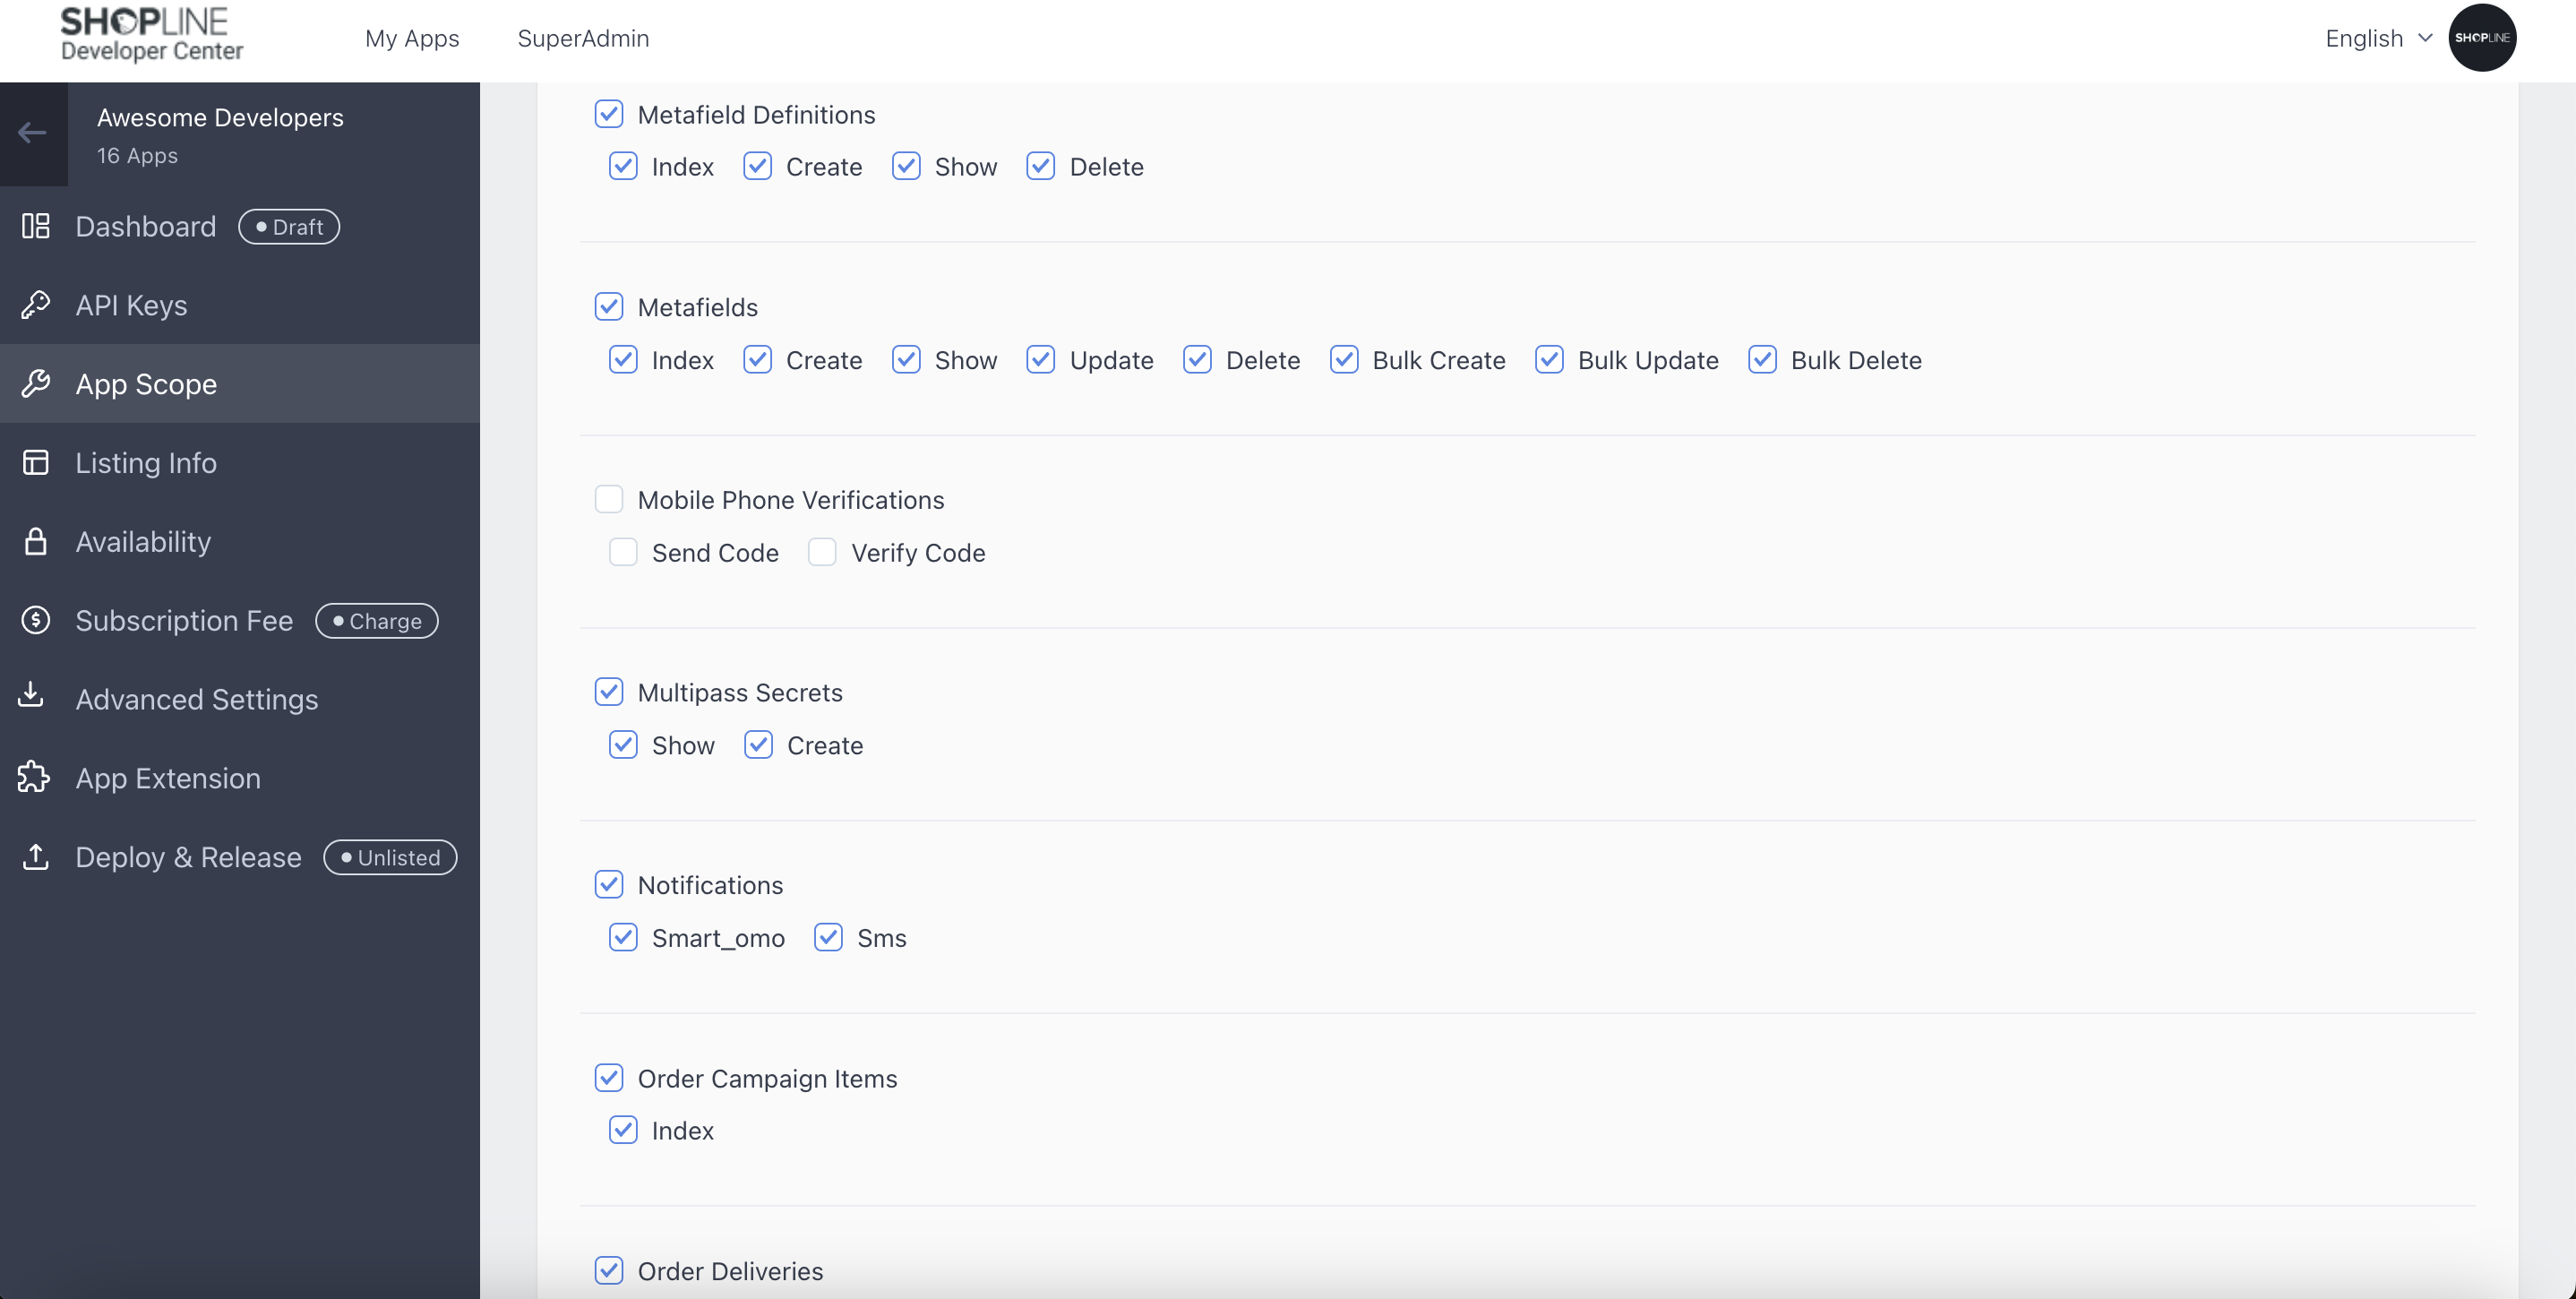
Multipass for App developer & vendor (suggested flow for non merchant)
For App developer, you are suggested to use APIs to create secret on behalf of merchant. In this way, the secret will be in per app per merchant level which enhance security level and avoid potential issues or conflicts with merchant & other app partners.
Prerequisite
-
Create App & select multipass secrets
-
Deploy development version App
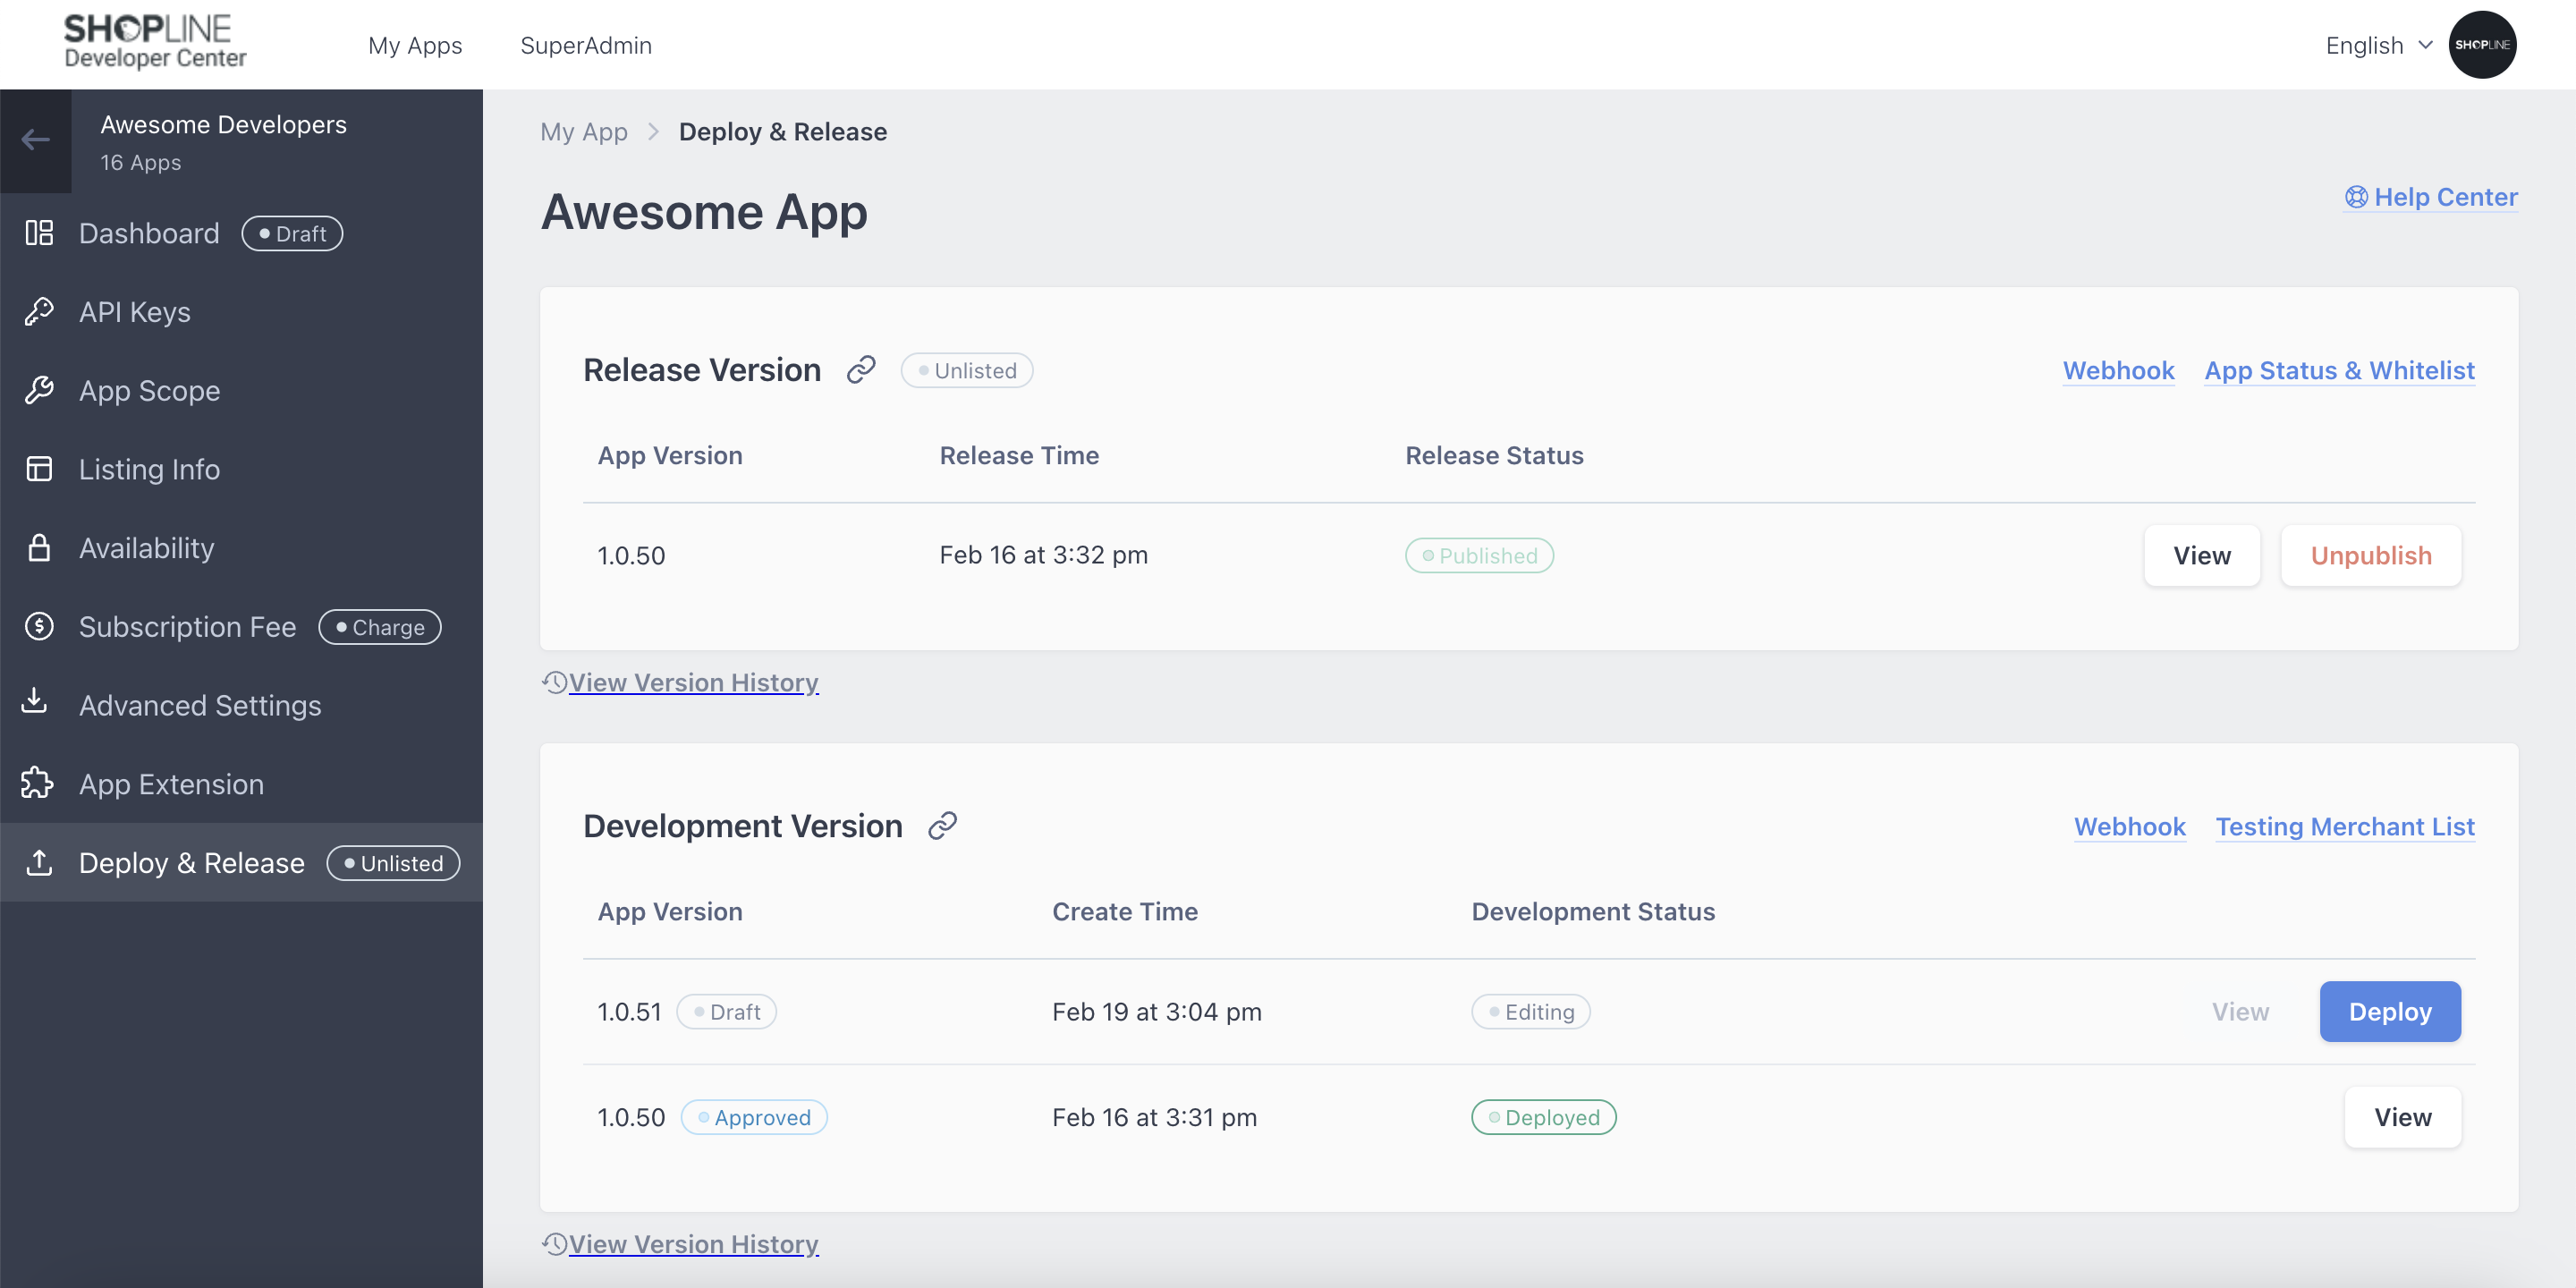
-
Install and authorize this App in your testing store

Create secret with API
Once your App get the App token, you are ready to use it to create per app per merchant multipass secret with API.
To create a multipass secret, make a POST request to the API endpoint
POST https://open.shopline.io/v1/multipass/secret with a Bearer token in the header.
curl --request POST \
  --url https://open.shopline.io/v1/multipass/secret \
  --header 'Authorization: Bearer <TOKEN>' \
  --header 'User-Agent: insomnia/8.6.1'
package main
import (
"fmt"
"net/http"
"io/ioutil"
)
func main() {
url := "https://open.shopline.io/v1/multipass/secret"
req, _ := http.NewRequest("POST", url, nil)
req.Header.Add("User-Agent", "insomnia/8.6.1")
req.Header.Add("Authorization", "Bearer <TOKEN>")
res, _ := http.DefaultClient.Do(req)
defer res.Body.Close()
body, _ := ioutil.ReadAll(res.Body)
fmt.Println(res)
fmt.Println(string(body))
}var axios = require("axios").default;
var options = {
method: 'POST',
url: 'https://open.shopline.io/v1/multipass/secret',
headers: {
'User-Agent': 'insomnia/8.6.1',
Authorization: 'Bearer <TOKEN>'
}
};
axios.request(options).then(function (response) {
console.log(response.data);
}).catch(function (error) {
console.error(error);
});Example Response
{
	"merchant_id": "65a4f8c9b01b5ca2d933d170",
	"app_id": "65323fa8e29afb000e2856b8",
	"secret": "EebxLeaDza",
	"status": "active",
	"updated_at": "2024-02-21T07:03:39.9Z",
	"created_at": "2024-02-21T07:03:39.9Z"
}
Get secret
To retrieve the secret, make a GET request to the API endpoint
GET https://open.shopline.io/v1/multipass/secret with a Bearer token in the header.
curl --request GET \
  --url https://open.shopline.io/v1/multipass/secret \
  --header 'Authorization: Bearer <TOKEN>' \
  --header 'User-Agent: insomnia/8.6.1'
package main
import (
"fmt"
"net/http"
"io/ioutil"
)
func main() {
url := "https://open.shopline.io/v1/multipass/secret"
req, _ := http.NewRequest("GET", url, nil)
req.Header.Add("User-Agent", "insomnia/8.6.1")
req.Header.Add("Authorization", "Bearer <TOKEN>")
res, _ := http.DefaultClient.Do(req)
defer res.Body.Close()
body, _ := ioutil.ReadAll(res.Body)
fmt.Println(res)
fmt.Println(string(body))
}var axios = require("axios").default;
var options = {
method: 'GET',
url: 'https://open.shopline.io/v1/multipass/secret',
headers: {'User-Agent': 'insomnia/8.6.1', Authorization: 'Bearer <TOKEN>'}
};
axios.request(options).then(function (response) {
console.log(response.data);
}).catch(function (error) {
console.error(error);
});The response is the same as above.
Calling Open APIs with App access tokenFor more details on how to performing this task, please refer to the document here
Prepare JSON data
An example JSON data:
{
  "email": "[email protected]",
  "country_calling_code": "852",
  "mobile_phone": "12345678",
  "sub": "hello_world", #optional
  "name": "developer_x" #optional
  "return_to": "/products", #optional
  "created_at": 1707292488
}
Below data fields must be included in Json
- Email / mobile no. (At least one parameter must be provided, both parameters can be provided as well)
- Mobile no. :support all country calling ode
- Created at (token created time)
If compulsory info is missing in token, SHOPLINE will return errorMore details please refer to this section
Below data fields are optional
- Sub = Identifiers (Suggested; the purpose on using identifiers will be explained below)
- name (Optional)
- return_to (Optional; the purpose on using identifiers will be explained below)
Encrypt and sign the JSON data with secret
To begin, you need to first derive 2 keys (encryption key and signature key) from the multipass secret. This is done by using the SHA-256 function where the first 128bits is used as the encryption key and the last 128bits are used for the signature key.
Afterwards, encrypt the JSON using AES-128 (CBC) with the encryption key acquired from the previous step.
Sign the encrypted JSON data using HMAC SHA-256.
Finally, encode the data using base64 (URL-safe variant, RFC 4648)
Example Code for generating token:
require "openssl"
require "base64"
require "time"
require "json"

class ShoplineMultipass
  def initialize(multipass_secret)
    ### Use the Multipass secret to derive two cryptographic keys,
    ### one for encryption, one for signing
    key_material = OpenSSL::Digest.new("sha256").digest(multipass_secret)
    @encryption_key = key_material[ 0,16]
    @signature_key  = key_material[16,16]
  end

  def generate_token(customer_data_hash)
    ### Store the current time in UNIX format.
    ## The token will only be valid within 10 minutes from this timestamp.
    customer_data_hash["created_at"] = Time.now.to_i

    ### Serialize the customer data to JSON and encrypt it
    ciphertext = encrypt(customer_data_hash.to_json)

    ### Create a signature (message authentication code) of the ciphertext
    ### and encode everything using URL-safe Base64 (RFC 4648)
    Base64.urlsafe_encode64(ciphertext + sign(ciphertext))
  end

  def decrypt(text)
    base = Base64.urlsafe_decode64(text)
    data = base[0, base.length-32]

    decipher = OpenSSL::Cipher.new("aes-128-cbc")
    decipher.decrypt
    decipher.key = @encryption_key

    decipher.iv = data[0, 16]
    plain = decipher.update(data[16, data.length]) + decipher.final
  end

  private

  def encrypt(plaintext)
    cipher = OpenSSL::Cipher.new("aes-128-cbc")
    cipher.encrypt
    cipher.key = @encryption_key

    ### Use a random IV
    cipher.iv = iv = cipher.random_iv

    ### Use IV as first block of ciphertext
    iv + cipher.update(plaintext) + cipher.final
  end

  def sign(data)
    OpenSSL::HMAC.digest("sha256", @signature_key, data)
  end
end

customer_data = {
  email: "[email protected]"
}

token = ShoplineMultipass.new("7c420668de2ac561").generate_token(customer_data)
Access SHOP with multipass token
<SHOP_URL>/users/sign_in/multipass/<TOKEN>Multipass Token Analysis and Account Binding
When the SHOPLINE system receives data from a Multipass token, it follows a set process to bind and log in to the SHOPLINE STOREFRONT system.
Binding Priority and Login logic highlight
The system priorities the following attributes for account binding and login:
- Identifiers >
- Email >
- Mobile number
If an account has already been bound using identifiers, this binding relationship always takes the highest priority over email and mobile number.
Redirect after Sign in
To enable a customizable redirect feature after a successful sign-in, add the return_to parameter to the JSON data. This allows you to specify the path to which the customer should be redirected by including it in the token.
Here are the instructions:
- Include a
return_tofield in the token' Json data - Ensure that the
return_tovalue meets the following criteria:
It must start with a forward slash (/).
It should not redirect to internal paths. Refer to the provided list (not exhaustive) to identify internal paths.
return_to must satisfy below 2 criteria:
- must start with a
/ - should not redirect to internal paths (Below
internal pathslist is provided for reference, please note it is not an exclusive list)
/404
/password
/robots.txt
/sign_up_confirmation
/users/auth/facebook/callback
/users/auth/facebook/setup
/users/auth/line/setup
/users/blacklisted
/users/complete_info
/users/confirmation
/users/edit
/users/password/edit
/users/password/new
/users/sign_in
/users/sign_out
/users/sign_up
After a successful sign-in, the customer will be automatically redirected to the specified path
remark:external url not support
Error Handling
Error Code
If the login is unsuccessful, an additional error_code get query parameter will be appended to the end of the redirect_url.
# Example: if the token is expired
<SHOP_URL>/?err_code=TOKEN_EXPIRED| Error Code | Meaning | Remarks |
|---|---|---|
| ALREADY_SIGNED_IN | Customer already signed in | |
| FEATURE_NOT_ALLOWED | Merchant do not have required feature key | |
| TOKEN_EXPIRED | The token is already expired | |
| TOKEN_ALREADY_USED | Token is already previously used | |
| MISSING_TOKEN | Token is missing in the header | |
| UNABLE_TO_DECRYPT_TOKEN | Failed to decrypt the given token | |
| INVALID_TOKEN_TIMESTAMP | The token timestamp is invalid | |
| INVALID_TOKEN_PAYLOAD | The token payload is invalid | |
| INVALID_TOKEN_SIGNATURE | The token signature is invalid | |
| INVALID_REQUEST | Unable to parse request data | |
| UNKNOWN_ERROR | Any other errors | Such as invalid email |
Updated 8 months ago