
Integration Guide
Introduction
Let’s say you are the owner of a successful website and have a large number of users. Now you want to sell goods through your SHOPLINE store and want to prevent to ask your user to register an online store account again.
3rd Party Customer Authentication can solve this problem by providing a 3rd party authentication method like Google Login. By leveraging your OAuth2.0 server, your users can log in with their existing account.
Pre-requisites
- Merchant have to subscribe the Customer Login Authorization. Please refer to the subscribe flow Details
- 3rd party authentication service must also support OAuth2.0 and OpenID standard.
Setup
Step 1 - Customer Authentication Tab
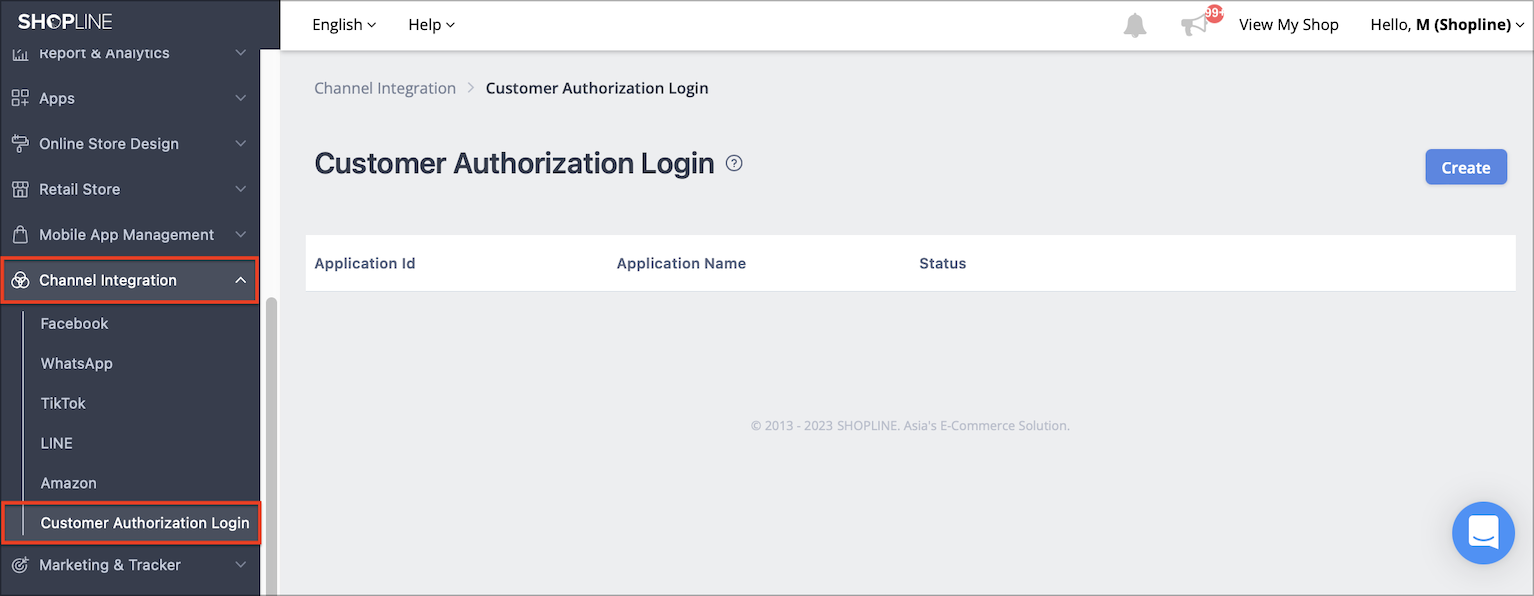
Log in to SHOPLINE admin of your store. On the left sidebar, choose Channel Integration > Customer Authorization Login. If you don’t see this option, please contact customer service of SHOPLINE.
Step 2 - Create Application
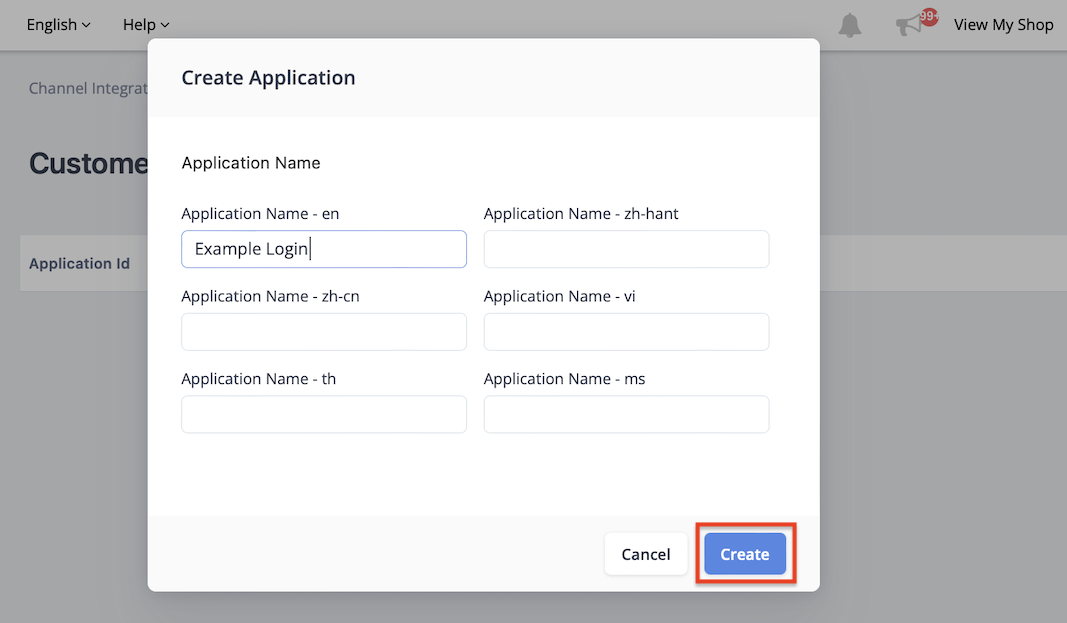
Click on Create button on the top right corner and Create Application popup is shown.

Step 3 - Create Application
Enter the "Application Name" and click Create.
*Note: The application name will display as button text of the "Login" button.
Step 4 - Edit Application
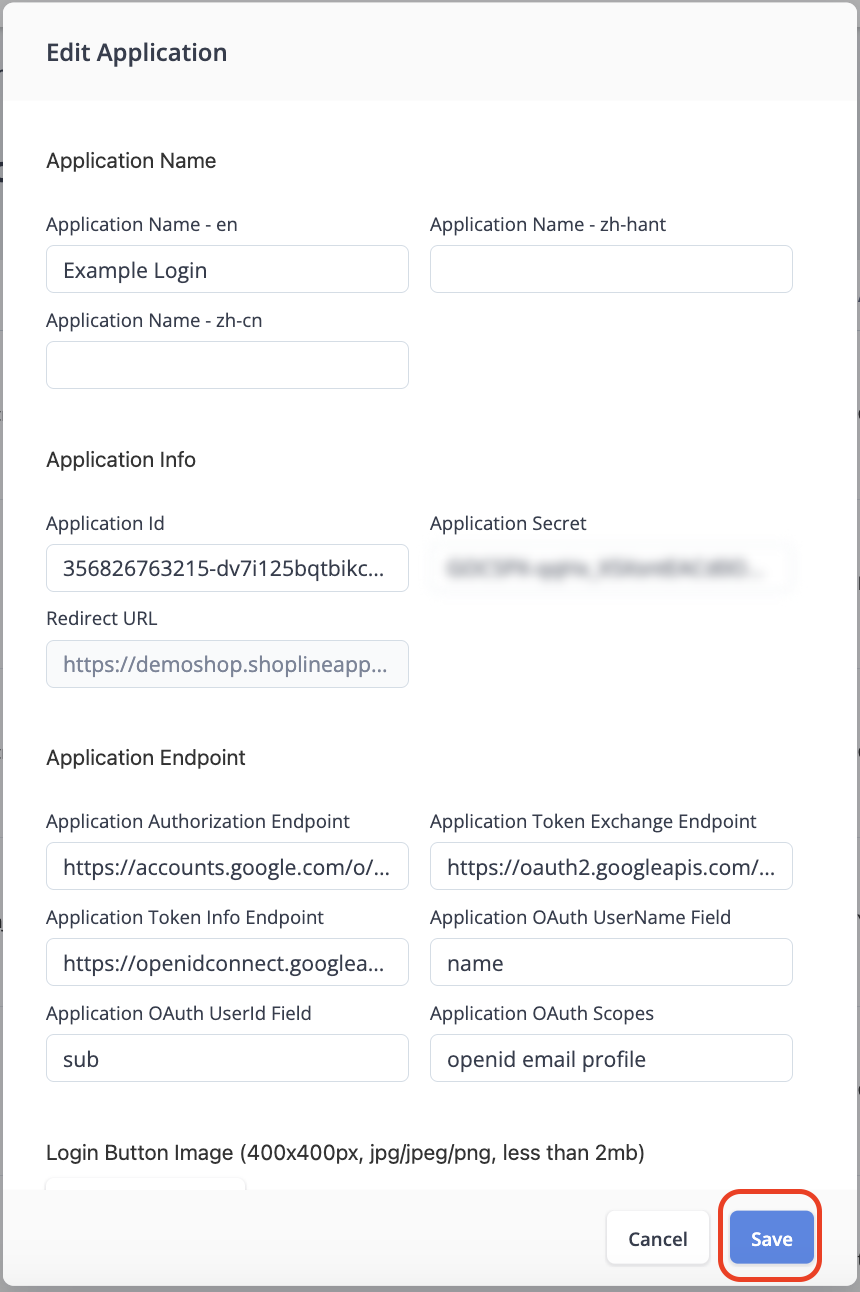
Click the Edit button on the right of the application you just created and Edit Application popup is shown.

Step 5 - Fill in Information
In the popup, you need to fill in the information to setup the customer authentication.
But first, register a new app on your OAuth server with following parameters:
- Redirect URL: Input the redirect URL that show in the Redirect URL
field Edit Application popup. (Double click the field and copy the value) - Scope:
openid email profile
Then, you can fill in the information in the tab based on the app you just registered in your OAuth server:
- Obtain and fill in Application Id and Application Secret from your OAuth server.
- Obtain and fill in Application Authorization Endpoint from your OAuth server.
(e.g.https://accounts.google.com/o/oauth2/v2/auth) - Obtain and fill in Application Token Exchange Endpoint from your OAuth server.
(e.g.https://oauth2.googleapis.com/token) - Obtain and fill in Application Token Info Endpoint from your OAuth server.
The UserInfo endpoint is as described in the OpenID Connect Core 1.0 specification.
(e.g.https://openidconnect.googleapis.com/v1/userinfo)- Customer authentication currently support login by email or mobile phone:
- For email, this endpoint should return a user object with the field
email - For mobile phone, this endpoint should return a user object with the fields
country_calling_code&mobile_phone- Example for Hong Kong phone number:
-
{
	"country_calling_code": "852",
  "mobile_phone": "12345678"
}
- When both email & mobile phone are provided, email will have a higher precedence.
- For email, this endpoint should return a user object with the field
- Customer authentication currently support login by email or mobile phone:
- Obtain the field name of user name and fill in Application OAuth UserName Field.
The user name will be extracted to the user object in SHOPLINE database.
(e.g.name) - Obtain the field name of user id and fill in Application OAuth UserId Field.
The user id will be extracted to the user object in SHOPLINE database.
(e.g.sub) - Fill in Application OAuth Scopes with
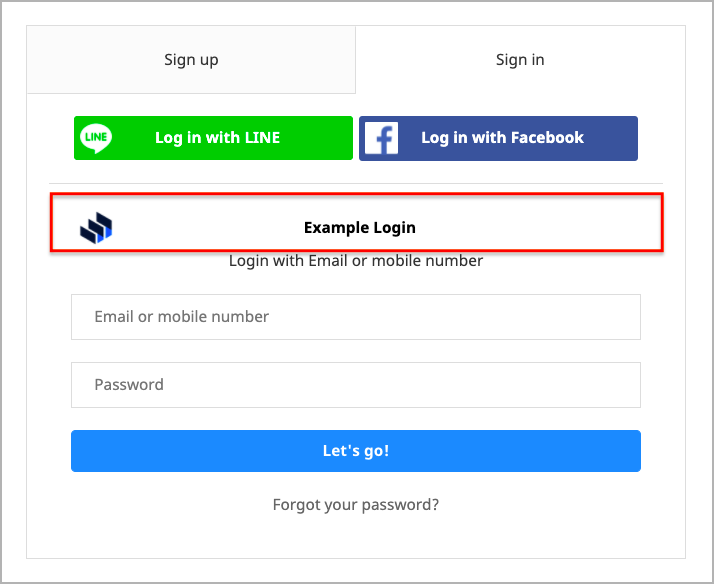
openid email profile - Upload a Button Image representing your service.
This image will be displayed as the login button in your SHOPLINE store.
(Resolution: 400x400, Format: png, jpg)
After you have finished filling out the information, click Save.
Step 6 - Publish
Once you have confirmed all the information, click Publish.
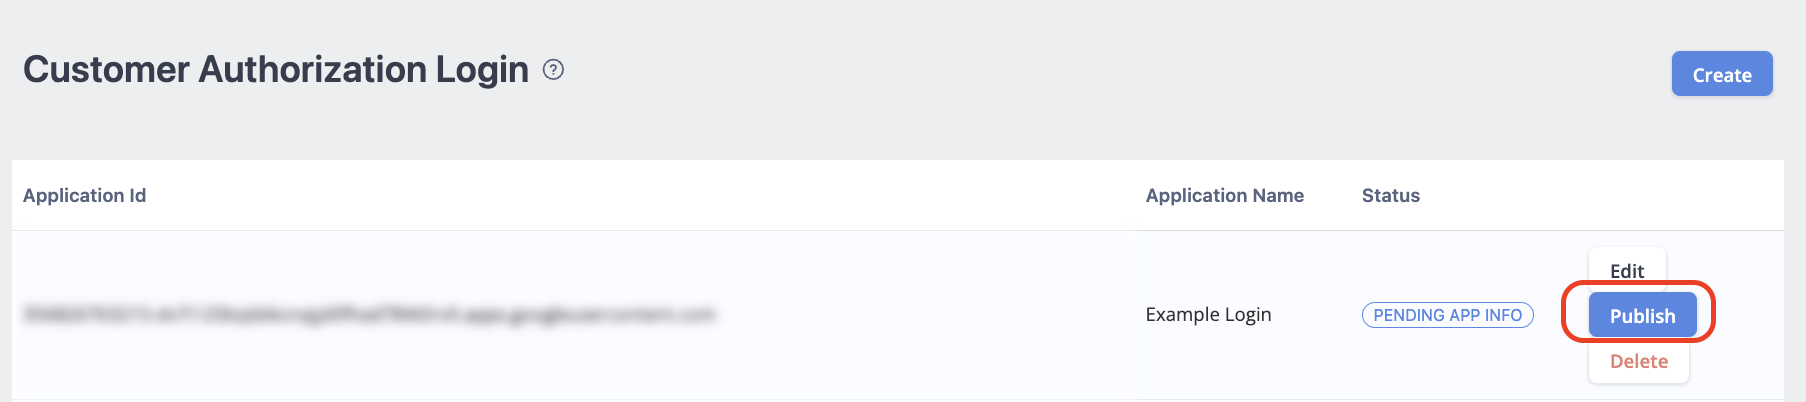
Once you click Publish, the status will update to "Published."

When customers register / login in your SHOPLINE store, they can quickly register / log in with the button you set up.
In case you need to edit the information again, click Unpublish to unpublish the application and click Edit again to edit the information.

Note that the button will NOT be shown in your SHOPLINE store unless the application is published.
Technical Specifications
Authorization Endpoint
Sample Request
GET /oauth/authorize?response_type=code&client_id=s6BhdRkqt3
    &redirect_uri=https%3A%2F%2Fclient%2Eexample%2Ecom%2Fcb HTTP/1.1
Host: server.example.com
Sample Successful Response
HTTP/1.1 302 Found
Location: https://client.example.com/cb?code=SplxlOBeZQQYbYS6WxSbIA
Sample Error Response
HTTP/1.1 302 Found
Location: https://client.example.com/cb?error=access_denied
Please refer to:
- OAuth 2.0 - 4. Obtaining Authorization
- OAuth 2.0 - 4.1. Authorization Code Grant
- OAuth 2.0 - 4.1.1. Authorization Request
Token Exchange Endpoint
Sample Request
POST /oauth/token HTTP/1.1
Host: server.example.com
Content-Type: application/x-www-form-urlencoded

grant_type=authorization_code&code=SplxlOBeZQQYbYS6WxSbIA
&redirect_uri=https%3A%2F%2Fclient%2Eexample%2Ecom%2Fcb
&client_id=s6BhdRkqt3&client_secret=7Fjfp0ZBr1KtDRbnfVdmIw
Sample Successful Response
HTTP/1.1 200 OK
Content-Type: application/json;charset=UTF-8
Cache-Control: no-store
Pragma: no-cache

{
  "access_token":"2YotnFZFEjr1zCsicMWpAA",
  "token_type":"example",
  "expires_in":3600,
  "refresh_token":"tGzv3JOkF0XG5Qx2TlKWIA",
  "example_parameter":"example_value"
}
Sample Error Response
HTTP/1.1 400 Bad Request
Content-Type: application/json;charset=UTF-8
Cache-Control: no-store
Pragma: no-cache

{
  "error":"invalid_request"
}
Please refer to:
- OAuth 2.0 - 4.1.3. Access Token Request
- OAuth 2.0 - 2.3.1. Client Password
- OAuth 2.0 - 5. Issuing an Access Token
- OAuth 2.0 - 5.1. Successful Response
- OAuth 2.0 - 5.2. Error Response
Token Info Endpoint
Sample Request
GET /oauth/token/info HTTP/1.1
Host: server.example.com
Authorization: Bearer 2YotnFZFEjr1zCsicMWpAA
Sample Successful Response (Email)
HTTP/1.1 200 OK
Content-Type: application/json

{
 "sub": "248289761001",
 "name": "Jane Doe",
 "email": "[email protected]"
}
Sample Successful Response (Phone)
HTTP/1.1 200 OK
Content-Type: application/json

{
 "sub": "248289761001",
 "name": "Jane Doe",
 "country_calling_code": "852",
 "mobile_phone": "12345678"
}
Sample Error Response
HTTP/1.1 401 Unauthorized
WWW-Authenticate: Bearer error="invalid_token",
  error_description="The Access Token expired"
Please refer to:
- OpenID Connect Core 1.0 - 5.3. UserInfo Endpoint
- OpenID Connect Core 1.0 - 5.3.1. UserInfo Request
- OpenID Connect Core 1.0 - 5.3.2. Successful UserInfo Response
- OpenID Connect Core 1.0 - 5.3.3. UserInfo Error Response
Error Code Response
Below are the list of error codes and corresponding description for reference.
| Code | Description |
|---|---|
| USER_UNMATCH | OAuth UserName field or UserId field unmatch with token info endpoint response or token info does not match with any existing customer |
| AUTH_REQUEST_FAILED | Post token exchange or token info endpoint failed |
| MISSING_TOKEN | Code given by app authorization endpoint is invalid, or missing |
| UNKNOWN_ERROR | Fallback error not matching above cases |
Reference
OAuth2.0
OpenID Connect 1.0
Updated 8 months ago